Practice - Stargate
In this lesson, we will consolidate the obtained theory and create a mobile application that receives movies from the server and displays them on the screen.

The first thing we do is lay out the header. The component consists of the component View and Text. Paste this code into your index.js file.
Please note that I write the name of the file where the code should be written at the top in the LiveEditor.
State - useState
Now we will receive data into the header from the state of the state component using the useState hook
Application architecture
Если мы все будем писать в одном файле index.js, то в скором времени нам сложно будет поддерживать приложение, так как количество кода на одной странице достигнет критического предела, что сломает ваш мозг.
Поэтому важно с самого начала создать удобную организационную структуру компонентов.
В общем я организую свои проекты так:
src/components- это строительные блоки из которых строится приложение - UIKit.src/screens- это экраны на которых собирается приложение.src/logic- это слой бизнес логики и store.
components
Based on the architecture of our project, create a src folder, a components folder in it, then Header with the index.js file. Where we recall the topic by props and pass it to the header title
import React from 'react'
import { StyleSheet, View, Text } from 'react-native'

const styles = StyleSheet.create({
  viewStyle: {
    backgroundColor: '#30d0fe',
    justifyContent: 'center',
    paddingLeft: 22,
    shadowColor: '#000',
    shadowOffset: { width: 0, height: 2 },
    shadowOpacity: 0.2,
    elevation: 2,
    height: 90
  },
  textStyle: {
    color: '#fff',
    fontSize: 28
  }
})

const Header = ({ title }) => {
  const { textStyle, viewStyle } = styles
  return (
    <View style={viewStyle}>
      <Text style={textStyle}>{title}</Text>
    </View>
  )
}

export { Header }
Point of entry
In order not to produce noodles from imports:
import Header from './src/components/Header'
import Card from './src/components/Card'
import Storage from './src/components/Storage'
It is much more elegant to import them on one line, like this:
import { Header, Card, Storage } from './src/components'
To do this, we create a file in the ./src/components folder where other components will be added by analogy with the Header component:
export * from './Header'
Importing the code from the UI Kit
Now you can import the Header component and check how everything works:
import React from 'react'
import { Header } from './src/components' // import here

const App = () => (
  <>
    <Header title="STAR GATE" />
  </>
)

export default App
useEffect
What if we need to display data from the server?
To do this, we use the useEffect hook in conjunction with useState, where we:
- Get data from the server via
fetchin theuseEffecthook - Pass the data to the
useStatehook
import React, { useState, useEffect } from 'react'
import { View } from 'react-native'
import { Header } from './src/components'

const App = () => {
  const [data, setData] = useState('')

  useEffect(async () => {
    try {
      const response = await fetch('https://leelachakra.com/resource/stargate/data.json')
      const json = await response.json()
      setData(json)
    } catch (e) {
      console.log(e)
    }
  }, [])

  console.log(`data`, data)

  return (
    <View>
      <Header title="STAR GATE" />
    </View>
  )
}

export default App
Open Debbuger, where we see the received data.
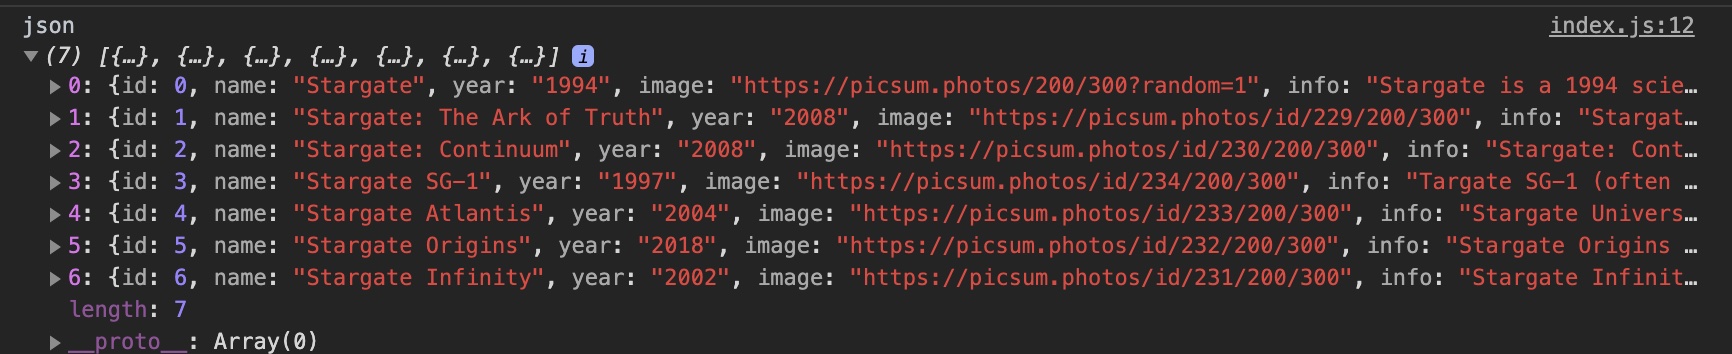
ImageCard
We have received the data and now we are imposing the layout of the ImageCard for displaying the movie.
import React from 'react'
import { Image, View, Text, StyleSheet, Dimensions } from 'react-native'

const w = Dimensions.get('window').width

const styles = StyleSheet.create({
  container: {
    width: w / 2.4,
    top: 20
  },
  sub: {
    shadowColor: '#000',
    borderRadius: 10,
    backgroundColor: 'white',
    shadowRadius: 8,
    shadowOffset: { width: 0, height: 5 },
    shadowOpacity: 0.4
  },
  h1: {
    paddingVertical: 10,
    fontSize: 18,
    alignSelf: 'center',
    textAlign: 'center'
  },
  cover: {
    width: w / 2.4,
    height: w * 0.63,
    borderRadius: 10
  }
})

const ImageCard = ({ data }) => {
  const { container, sub, h1, cover } = styles
  const { image, name } = data
  return (
    <View style={container}>
      <View style={sub}>
        <Image style={cover} source={{ uri: image }} />
      </View>
      <Text style={h1}>{name.toUpperCase()}</Text>
    </View>
  )
}

export { ImageCard }

Flatlist
Let's remember from the previous lessons the FlatList component thanks to which we create a list of our films.
import React, { useState, useEffect } from 'react'
import { View, FlatList, StyleSheet, Text } from 'react-native'
import { Header, ImageCard } from './components'

const App = () => {
  const [data, setData] = useState([])

  useEffect(async () => {
    try {
      const response = await fetch('https://leelachakra.com/resource/stargate/data.json')
      const json = await response.json()
      console.log(`json`, json)
      setData(json)
    } catch (e) {
      console.log(e)
    }
  }, [])

  return (
    <FlatList
      ListHeaderComponent={<Header title="STAR GATE" />}
      columnWrapperStyle={{ justifyContent: 'space-around' }}
      numColumns={2}
      data={data}
      renderItem={({ item }) => <ImageCard data={item} />}
      keyExtractor={item => item.id.toString()}
    />
  )
}

export default App
From the new in it we see the properties:
ListHeaderComponent
To display the header in the list, the ListHeaderComponent property is used, to which we pass the Header component.
numColumns
Number of columns.
columnWrapperStyle
This is the styling property of the list wrapper.
keyExtractor
Used to retrieve the unique key for a given item at the specified index. The key is used for caching and as a responsive key to track the reordering of items. These unique keys allow the VirtualizedList (on which the FlatList is built) to keep track of the items and are really important from an efficiency standpoint.

To see how well you learned this lesson, take the test in the mobile application of our school on this topic or in the telegram bot.
Done
Contributors ✨
Thanks goes to these wonderful people (emoji key):
 Dmitriy Vasilev 💲 |